Author Archives: Cindy Rice

Unknown's avatar

About Cindy Rice

My wonderful husband, my beautiful daughter, and I live in northeastern Illinois with our two sweet chihuahua boys. For as long as I can remember I have loved dolls and making things. I got my first Barbie when I was only three years old! My mom sewed for my Barbie dolls and taught me how to use her sewing machine when I was only seven. I cannot believe she let me near that needle, but she did. Not having enough money for my clothes habit in high school and college led me to start sewing all of my own clothes. There were so many fabric stores around back then and fabric was so inexpensive. I would wait for the 99 cent pattern sale and go crazy. Sewing for myself continued well into my 30’s. (I even made my wedding gown and bridesmaid dresses.) Shortly after I got married I left my full time graphic design position and started designing cross stitch patterns. I called my company “The Lilac Studio” and sold my botanical patterns at trade shows, through distributors which sold to retail shops, and mail order. My most popular pattern, “A Bouquet of Pansies” sold 5000 copies and won a J&P Coats Golden Needle Award! I was also featured in various cross stitch magazines and designed special projects for the magazines. When my daughter was born I didn’t have the time needed to cross stitch and design patterns all day long so I let my pattern design business slip away. And then I started discovering dolls again and I now had an excuse to start buying them. The only problem was that they were for my daughter and not for me. I soon discovered all of the adult collectors out there and decided I would be one of them. I started small at first, collecting Mattel Kelly dolls. Soon I collected over 100 Kelly dolls! After Kelly, I discovered Helen Kish’s Riley and Tonner’s Ann Estelle. I have since learned to knit doll sweaters and love an excuse to knit so most of my doll outfits include a sweater and/or hat. I love creating miniature outfits for dolls and enjoy sharing them with others. Currently I create doll ensembles for Ruby Red Fashion Friends, Kish Bethany, Dianna Effner's Little Darlings, Wilde Imagination's teeny tiny Amelia, Kaye Wiggs BJD, Boneka 10", Linda Macario's Penny.

“Woodland Roses”

We had a beautiful, sunshiny day yesterday and so Patience went out for a walk in our woodland garden. She brought her basket along for collecting floral treasures.  Even though there is a touch of fall in the air, we have not had a frost yet, so blossoms are still plentiful.

Patience is wearing her new calico dress with coordinating wool sweater and headband hat.  Yes, she wanted one of these vintage-styled headbands too.  Doesn’t she look cute with the bow tied under her chin!

I focused on the rosy pinks when creating the main pieces for this ensemble.  There is some yellow in the print, but it just wasn’t working with the pink sweater when I started the embroidery. I tried every shade under the sun (every shade I had anyway), but it wasn’t meant to be.  You know, I don’t miss the yellow at all; I like the monochromatic embroidery.

woodland-roses-580

woodland-roses-307

woodland-roses-544

woodland-roses-576

Patience found so many blossoms.  Maybe one of them is for you!

woodland-roses-558

Patience’s “Woodland Roses” ensemble will be available tonight, Tuesday (October 3, 2016) at 7:00 pm CST, cindyricedesigns.com.

Thanks for stopping by! ❤

“Lovin’ Autumn”

Finally… some sunshine to take photos.  Until this morning, Monday, we haven’t seen the sun since last Wednesday!  It’s been very dark and rainy, and very hard to get some good photos.

I’ve been working on a knitting pattern for ? (it’s a surprise), and taking photos of the steps along the way.  I thought they’d be okay, so kept knitting along.  You know what?  They are all terrible, in the virtual trash those photos will have to go.  Now I have to start knitting another sweater to get (hopefully) better photos.  Since the pattern is written, I can follow it to see if it all makes sense and my counts are accurate.  So, I guess it’s a good thing.  It’s turned into at least an 11 page pattern.  My notes I use when knitting this sweater fill up 1/2 of a page in my 5 x 7 knitting notebook!  See I really do work from gibberish that only I can understand.  lol

So, here is little Sugar, my Fairyland Pukipuki.  I decided I liked the sleeved dress on her after all.  If she’s posed a certain way her arms look fine, I think so anyway.  Isn’t she the cutest little thing!  I never seem to get tired of her sweet face.

lovin-autumn-492

Sugar’s a-line elbow length sleeved dress (hand knit in lace weight merino heather) is perfect for fall, no goose bumps on this little girl.  The embroidery on the bodice is a tiny mirrored floral motif and done in colors to coordinate with her leggings.

This cute knit fabric goes so perfectly with her dress.  I still wanted her shoes to fit, so instead of tights made some longish leggings that give the effect of tights.

Of course she found some matching fall blossoms in the woods.  We haven’t had a frost yet, thank goodness, so the flowers are still in bloom.  The silk streamers on her bouquet keep her smiling as they flutter in the breeze.

Now like the bigger girls, Sugar has her very own bangle bracelet with a dangly heart; only Sugar can wear bangle bracelets.

lovin-autumn-526

lovin-autumn-499

lovin-autumn-517

lovin-autumn-540

Sugar’s “Lovin’ Autumn” ensemble will be available Tuesday night at 7:00 pm CST, cindyricedesigns.com.

Thanks for stopping by today!  Bye for now. ❤

10 Tips for Embroidering on Hand Knits

I got some requests for help with embroidering on knitwear the other day, so I thought I’d put together a list of some things to help you get started.  I want to point out that this isn’t the “bible” for embroidering on knitwear, but simply a starting point to highlight what I think are basic and helpful tips.  If you do have something to add that works for you, please feel free to add your tips and tricks to the comments below.

1. Get comfortable with executing the stitches on fabric first.  Mary Corbet has video tutorials for many stitches on her website.  Knitted fabric is lumpy and bumpy, and can be unpredictable.  Being comfortable with the stitches  will take away some of the frustration.

2. Use a milliner’s (straw) needle.  It’s longer, and the entire needle is the same thickness.  These are necessary for making great knotted stitches (bullion, french knots, colonial knots, etc).  This is the pack I purchased and use the two in between sizes.

3. I use two to four strands of embroidery floss, usually two.  If you use an even number of strands you can secure your strands as shown in the photo below, no knot is needed.  I cut about a 36″ strand and fold it in half; it’s now an 18″ double strand.  Thread both cut ends through the needle.  There are other ways, but this way is my favorite.  (I learned this from my cross stitch model stitcher 20+ years ago, thank you Geri.)

instead-of-a-beginning-knot-290


4. When embroidering, bring your needle through (or splice) the middle of a strand of yarn, not between knit stitches.  Sometimes you can get away with going through the stitch spaces if your embroidery stitches are bulkier than your knitting, but most times the stitches will get lost between knit stitches, or worse, pull to the wrong side of the knitted piece.  When working with lace weight yarn it can seem impossible to splice a strand of yarn with your embroidery needle, so put on your reading glasses or work with a magnifier.  You will be happier with your work if you can see it properly.

5. I use a large cushioned quilter’s board to work on; it acts as a pincushion for quickly setting your needles into and keeps things from rolling around.  I also use it to hold my piece in place when trying to create the perfect stitch.  Use straight pins as you’d use thumb tacks to secure a corner, one is all you usually need.  The board is also what I block my knitwear on, so it’s a great investment.

6. When ending a color, tie 3 half knots (the strands need to be coming out of different spots on the reverse side).  To do this, take a tiny stitch on the reverse side and allow only one strand to pull through, now your tails are coming out of different places.  Rethread the knotted tail onto a needle (this needle can be easy to thread, and larger in size) and “hide” the knot in embroidery threads or partial strands of yarn to keep the knot from sticking out.  Cut your thread leaving about a 1/8″ tail.

7. FYI, there isn’t any way to draw your design on knitwear; at least none that I know of—it’s all freehand work.  Sometimes it helps to draw your design on paper and follow your sketch as a rough layout.  I draw circles for bullion roses, ovals for buds, petal shapes for lazy daisy stitches, etc.

8. Be willing to rip out stitches that you aren’t happy with.  After years of embroidering on knits, I still quite often rip out stitches.  And by quite often, I mean almost every project!  Either a color isn’t working for me, or the stitch is not laying correctly on the fabric.  It’s part of the process, so expect it.

9. Learn from your past work and the the work of others.  What did you like, or not like about it?

10. Practice, practice, practice!  Your style will start to emerge the more you practice.

In case embroidering on knits seems overwhelming to you here’s a photo of one of my first sweaters/hats from 2011; it was for Kish Bethany.  I remember this embroidery being quite a challenge for me, and took ages to complete.  At the time, I was very happy with how it turned out.  When I look at this photo, I see numerous things that I would do differently today.  It’s okay, those thoughts help us better our work.

p1030227ebay

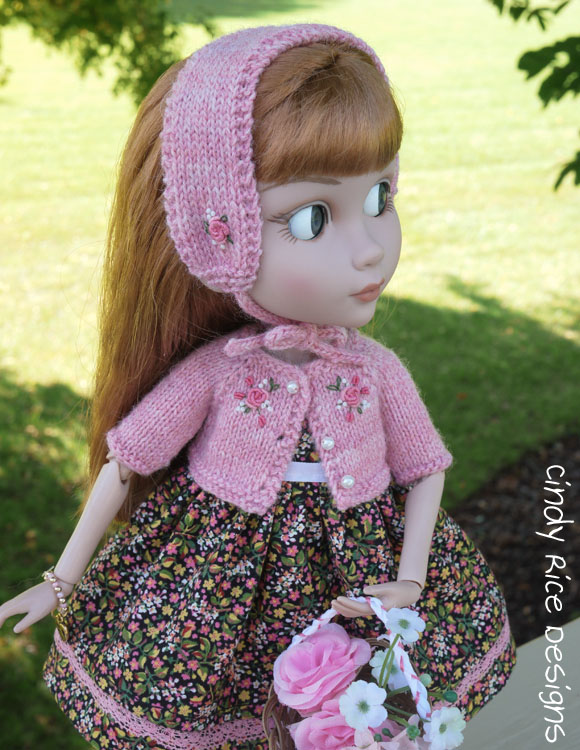
And, here are some photos from the past year or so.

This slideshow requires JavaScript.

I have also made three embroidery albums in Flickr:  Floral Embroidery, Christmas Embroidery, and Other Embroidery.  Nothing new here, but I grouped the photos into themes and picked the photos to best show the embroidery.  Enjoy!

If knitwear embroidery is something you’ve been wanting to try, I hope these tips will help you.  Let me know if you have questions; I’d be happy to help.

Bye for now!  Enjoy the weekend!