
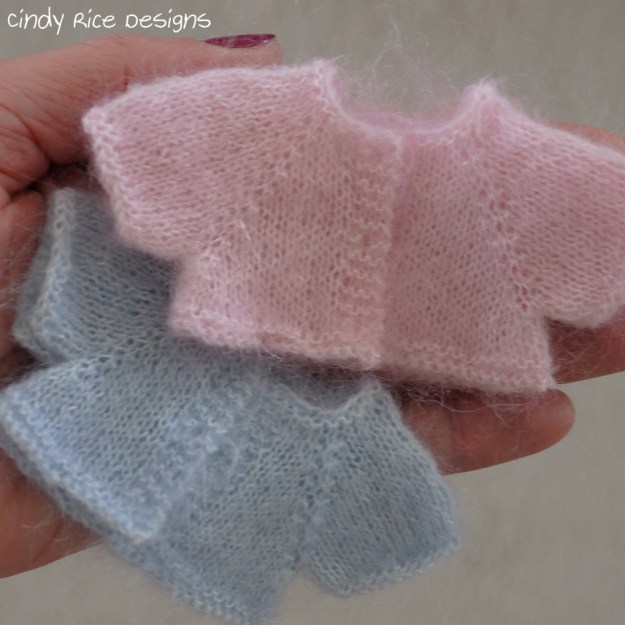
I’ve been promising a dyeing introduction tutorial since I posted this photo of my hand dyed pink and blue sweater, so here it is.
I’ll share with you some basics to get you started. By the way, I am in no way an expert and I am always learning. Think of dyeing as a science experiment; things don’t always come out as planned. This is my process that’s evolved over the five years or so that I’ve been dyeing with Jacquard Acid dye. In case you are interested here is a page I found at Paula Burch’s site where she explains this dye in a little more detail.
This mini tutorial is for animal or protein fibers such as: wool, silk, nylon, mohair, alpaca, etc. It is specific for small batch dyeing like I do for my doll items.
Things you’ll need:
Containers, various sizes, mine are from laundry detergent cups, face cream, old Rubbermaid containers (never use for food after dyeing in them)
Measuring spoons (never use for food after using for dye)
Piece of china silk to use as a “sifter”, can be reused, but make sure it has been rinsed of any dye powder
Distilled vinegar
Jacquard Acid Dye
Old towel to protect your surface, I dye on the washing machine, and have a laundry tub right next to me
Microwave, don’t use for food afterwards
Thermometer, not necessary, but helpful
Dust Mask, Vapor Mask
Rubber Gloves
I get my dye from Dharma Trading Company. The dye is called Jacquard Acid Dye and comes in lots of colors. I get the basic primary colors, ivory, ecru, pink and then mix my own colors from those. I mix the dye powder out of the jar into separate containers (I found this to give me the most control over color). So when I am mixing my final color I am mixing the dye liquids, not the powder.

In this case, I want to dye a sweater that I had already knitted and want it to be a very, very light cool pink, so I need to use pink dye and yellow dye.
First I put my white sweater in water (not hot or cold) to become evenly wet, about 15 minutes. I leave that sit off to the side (away from the dye powder) while getting my dye bath ready.

I know that my pink dye powder is just a hair too cool for the color I want, so I need to add a minuscule amount of yellow. I us a tiny pinch of each color to get the very light dyes that you see in the laundry detergent cups. The color gets even lighter when it is further diluted.
It is recommended to wear a mask especially when mixing up the dye, so as not to breathe in the dye powder and wear rubber gloves to keep the dye off of your skin. But, to be extra careful a mask should be worn throughout the entire process.
I use old cups from laundry detergent to initially mix my dye powder together with water (they are nice and tiny). So add a pinch (or however much dye you need) to the cup, then add a teaspoon or less of water. Don’t add a lot of water right away; it’s easier to dissolve the dye when it is kind of like a paste, or as thick as possible. Once it’s uniformly moistened add more water (1/4 cup?). After this I use a piece of dampened china silk (photos below) as a “sifter” because it is hard to get every particle of dye dissolved. If there are any undissolved particles they will sit on the piece of silk and not get into the dye bath. Some colors are harder to dissolve than others, but I do this for all of them, always. So I “sift” into a slightly larger container (my containers are from face cream) for each color and now I can add more water. The amount of water is undetermined. I like to think of these as my raw color, like paint coming out of a tube; I don’t necessarily use all of this colored liquid, only enough to get my shade. However, when adding water, the color shouldn’t be too dark to work with, or be lighter than the final color desired. By the way, I know I will only be using a very little bit of yellow water dye and most of it will be discarded.

Make sure to rinse the piece of silk between color “sifting”. You can see how I lay the piece of silk over the container; pour slowly so the silk stays put and keeps most of the liquid going into the container. If some dye runs down the end of the silk, it’s okay because I’ve protected my surface.

I now have a dye bath of pink and a dye bath of yellow, which become the ingredients for my final color, and can mix up my custom color dye bath. I use a container for dyeing my sweater that holds about 2 cups of liquid. I want what I am dyeing to have some room for stirring without spilling. Also, I need to add white vinegar to the dye bath for setting the color. I add a teaspoon (more than enough) for this light color. Here are Dharma’s instructions for dyeing with their vinegar quantities listed. I always add more than enough and it is okay. The photo below shows how light my dye bath is for the look I want to achieve.
Microwave dyeing may transfer dye and acid vapors into the room during the steaming process. Always use ventilation and a vapor mask to avoid inhalation of the fumes.
Now it is time to add my sweater to the dye bath. I don’t want to shock the fibers, so I heat up my sweater and dye together; the sweater gets heated gradually this way. I usually start with one minute, then take the temperature. I have a Raytek thermometer gun at home, so that is what I use. I find that getting the dye bath up to 140°F is sufficient for this light color. To get to approximately 140°F I keep heating for 30 seconds at a time, then check the temperature.
For dark or deep colors of fiber I may need to get close to the temperature that is recommended (200°F) or for silk, 185°F.
I am getting the color I want, so I stop heating and let my dye bath cool with my sweater remaining in the bath. I let my sweater cool in the dye bath to prevent shocking it. Remember, gradual heating and gradual cooling. For this sweater though, it was dark enough after a couple of minutes and I didn’t want to let it sit in the dye and get any darker. I gradually cooled the dye bath down by adding cool water little by little. Afterwards, simply rinse in clear water, gently press in a towel to remove excess water, block the piece or hang your ribbon or yarn to air dry.

Below is the sweater that I dyed. You can see that the way the dye bath water looks is not a perfect match for how the sweater actually came out. Sometimes I will dye a little bit of yarn if I am uncertain. In this case I knew what I wanted because of the pink test sweater in the first photo, lighter and a tad warmer.

Darker colors are trickier to dye. I’ve had yarn come out slightly darker in some areas than others. It’s fine for knitting and actually adds character to the yarn, but I don’t think I’d want that on a knitted piece. Sorry, I don’t know for sure what causes this color pooling. Here are some things I will try for my next project that I want to dye a darker or deeper color. 1. Leave out the vinegar until the dye bath is up to temperature (gently remove the piece while stirring in the vinegar). 2. Give the dye bath a gentle stir every so often, also stir between 30 second intervals while heating. Remember to be gentle with the wool as it can felt. 3. Do make sure there is enough room in the container surrounding the piece.
Here’s a sweater that I knit in bare yarn and decided to dye later. I mixed the color myself and got lucky; it came out beautifully matched to the print and evenly dyed. When I mix my own color I can make every color under the sun, it’s fun.
Disclaimer: I am not an expert on Jacquard Dye. Please read the safety information about Jacquard dye on Dharma Trading Company’s website before using. The information I’ve written in this post is only to share with you my process for dyeing small bits of wool, ribbon, or doll sweaters. I am not responsible for damage caused from this dye or from following my instructions, so please be careful. Dye can stain fingers (wear rubber gloves), clothes, sinks, etc. I dye in the laundry room (don’t dye where you will be working with food) where it doesn’t matter if something gets stained.
I hope that you’ve enjoyed this very basic introduction to dyeing protein fibers. Please ask any questions you may have and I’ll do my best to answer them.
Bye for now!


Genius. Thank you so much for sharing your method. Your results -like your creations- are inspiring
Thank you, Renee. I am glad I inspired your creating. 🙂
This is great information! Like dyeing Easter eggs. Leave them in longer and they become darker. Well, not quite as easy as Easter eggs though. So, I guess the wool sweater won’t shrink in the hot water? or you would end up with something for Amelia. 🙂
Thanks so much for the explanation.
Hi Joy,
Yes, that’s what happens; just like Easter eggs. The trick is to be gentle when stirring so as not to felt the sweater. The heat doesn’t shrink it, the agitation does. Once the sweater is blocked it is back to it’s exact original size. I’m glad you enjoyed my tutorial, thanks for reading it; I know it was quite long.
Thank you for sharing this tutorial! I am not really a fan of searching for a specific color of a yarn so dyeing could be an option for me. 🙂
Hi Kendra,
You’re welcome and I am glad you enjoyed my tutorial. I’ve even dyed DMC cotton floss with another method. I guess 400+ colors isn’t enough. lol